Deploying a Rails App with Elasticsearch to IBM Bluemix

First steps in Bluemix
For starters, I went to the Bluemix web page to create an account.
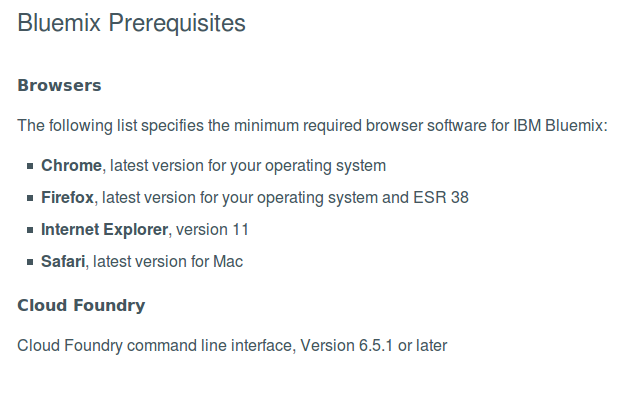
Users can manage their applications with the Cloud Foundry CLI in Bluemix, so I found the requirements for installing it. In the list of prerequisites, the Cloud Foundry CLI version 6.5.1 or later is specified.
I downloaded the latest version of the CLI—6.16.1. The cf ssh command released in the CF CLI v6.13.0 works with Diego, a container management system. For now, Diego is not active in Bluemix.
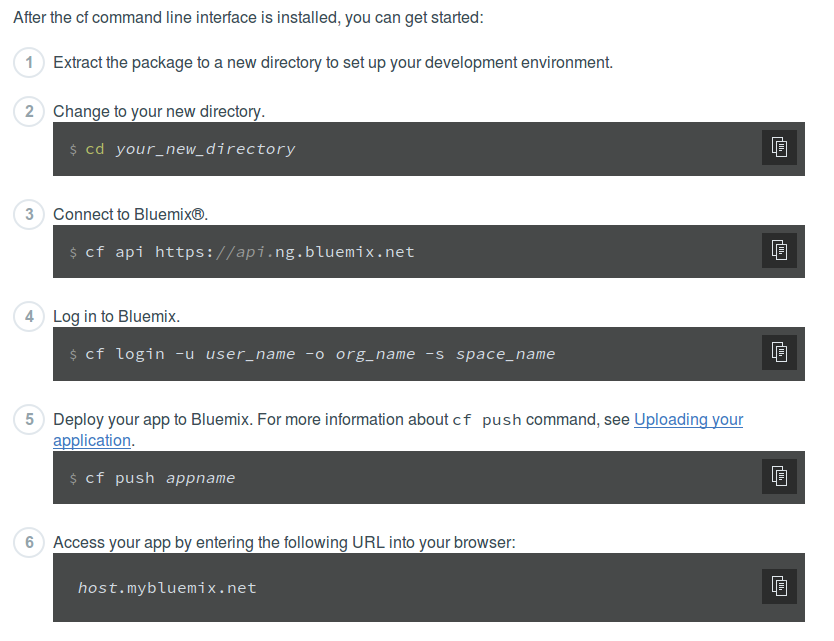
I used the documentation to connect to Bluemix via the Cloud Foundry CLI. On the way, you’ll meet things like organization and space.
Ruby and Bluemix
I’m a Ruby developer, so I want to know what are the buildpacks and versions that Bluemix provides.
Bluemix uses Cloud Foundry buildpacks and supports the Ruby versions 2.0.0, 2.1.6, 2.1.7, 2.2.2, and 2.2.3. If you need another version of Ruby (for example, the latest 2.3.0), you can refer to the external Ruby buildpack or create your own.
Services in Bluemix
To get my application running in Bluemix, I need to install services: one for PostgreSQL DB and one for Elasticsearch.
Unlike in Heroku, Bluemix environment variables are JSON objects with all service information, and you need to parse JSON to get the parameters you want to use. At my GitHub, you can see how to parse JSON to have access to the services.
To get the environment variables like in Heroku, you can add them manually on the Bluemix dashboard or with the cf set-env command.
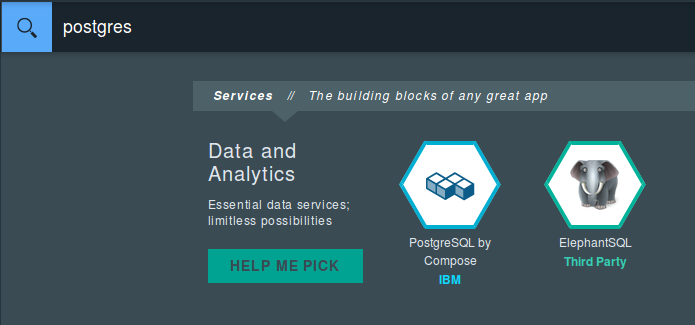
The DB service
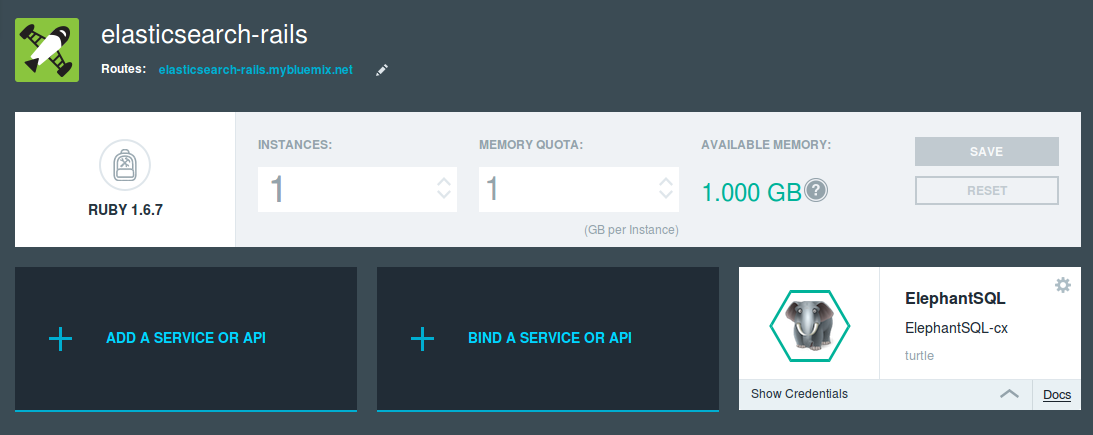
I found two services for Postgres. One is PostgreSQL by Compose, and it requires a registered account in Compose. They also ask for your payment information and offer a 30-day trial. The second option is ElephantSQL, which provides a free plan without having an extra account. I chose the second.
After getting the ElephantSQL service, you need to bind it to your application. On the dashboard with your application, you will see a button for binding. It creates an environment variable for the DB.
This is all? No, my friend, you still should run migrations.
You need to create the manifest.yml file that is used by Cloud Foundry when deploying an application. The file provides information about added services, host, number of instances, and so on.
The manifest supports the command option—the custom start command for your application or the command to run script files—that you can modify.
I created the file in my application and only modified the command option to run the migrations.

The Elasticsearch service
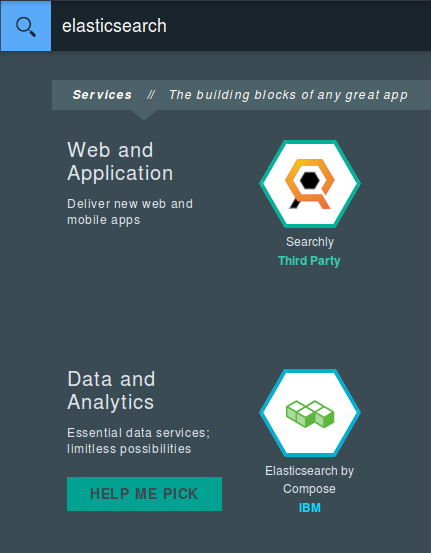
Now, we can add the Elasticsearch service. Similar to the DB service, I found two options. One—Elasticsearch by Compose—had the same restrictions as the service for the DB, so I chose the second service that offered a free plan—Searchly. I installed and bound the service to the application in the same way as I did for the DB service.
Deploy your application in Bluemix
To test Bluemix and its services, I created a simple application with CRUD functionality for posts and a search box using Rails and the scaffold command.
For making a deployment in Bluemix, you only need to run the cf push appname command.
Finally, we can see the application up and running.

The sample application has a seed that creates one hundred posts with random words. To run the seed, you need to run the cf push command with the -c flag and add the task there. In my case, it was cf push elasticsearch-rails -c “rake posts:seed”.
The last command run in the -c flag is remembered by cf push, so you need to execute it again with -c “null” to delete the saved command.
Conclusions: pros and cons
The first time that I tried to create an account in Bluemix, I had bad luck: the confirmation e-mail never reached my inbox. For this reason, I couldn’t use it again to log in, so I tried another personal e-mail account and everything worked well. When I got to the login page, there were two fields: one for the password and another for the IBM id. I didn’t have an IBM id, and the confirmation e-mail didn’t say anything about that, so I entered my e-mail account like an IBM id and voila! Finally, I could log in to Bluemix.
The documentation for getting started with Bluemix is easy and very helpful. However, if you try to find documentation for more specific cases, it can become a difficult task (for example, if you try to find the requirements for installing the Cloud Foundry CLI in Bluemix).
I personally don’t like how environment variables are saved in Bluemix. You need to use the JSON.parse method to parse the environment variables and then access the desired configuration, which means including additional code in your application without a reason. To solve this, Bluemix offers you a way to define environment variables like Heroku does, and you can obtain them using ENV['VARIABLE'].
Also, another thing I don’t like is the way it is used to run migrations. You need to add a new file (manifest) and know how to write it. You don’t want to run the migrations every time you make cf push. There are ways to avoid this problem, but you need to read about that.
Finally, you can’t connect to the instance running in Bluemix, so you need to make cf push every time you want to run a command (for example, rake db:seed). I know that commands are not executed very often in a production environment, but you might want to connect to a running application for debugging, or if you use Elasticsearch and indexes are being modified, you need to reindex everything in the DB.
For me, these are the weak points in Bluemix. At the same time, you have a great set of services that is growing, and I really like the application dashboard. Deploying an application is really easy, and you don’t need to do more than in Heroku. Also, you can configure an application in the manifest file.