How to Create a Page Layout and Login by Using Predix UI

Predix provides several UI components that help you to build web apps faster and easier. The components are implemented with Polymer, a lightweight library built on top of WebComponents, and can be integrated with other Predix services, such as Time Series.
Getting started
If you are interested in an already working application that uses Predix UI components, see predix-seed. It is a small AngularJS dashboard app (with some Nginx back-end code written in Lua for supporting UAA login). It employs Predix UI layout and a few other elements. To get started with the Seed app, just clone it, run npm install && bower install, and start the server with the grunt serve command.
Alternatively, you can use my minimalistic px-login demo app, which has a more traditional Express.js back end and fancy Pug for HTML templates.
For building and running the application, I used Grunt tasks that were mostly imported from the seed application. To start my application in the development environment, the following steps are performed:
- Pug templates are compiled into HTML files.
- The Express server is started, serving static files, as well as API endpoints.
In the production environment, the following additional steps, which should be taken between the previous two, are required:
- The Polymer loader is vulcanized, producing a single file that contains all the required components instead of the default one or multiple files per component.
- Static files—HTML pages and several scripts—are copied to the distribution directory.
For managing front-end packages, both the Seed and my applications use Bower.
The configuration of Grunt plugins can be found in the tasks/options folder. The Seed project splits the configuration into several files: one per plugin. My application stores them altogether in tasks/options/index.js.
Layout
In Predix UI, it is assumed that your application follows the styling defined in px-theme. Below you can find how a bare-minimum application page with Predix UI looks like.
The public/index.html file:
<!DOCTYPE html>
<html>
  <head>
    <meta charset="utf-8">
    <meta name="viewport" content="width=device-width, initial-scale=1.0">
    <title>Title</title>
    <script src="bower_components/px/dist/px.min.js"></script>
    <script src="bower_components/es6-promise/es6-promise.min.js"></script>
    <script src="bower_components/webcomponentsjs/webcomponents-lite.js"></script>
    <link rel="import" href="polymer-loader.vulcanized.html">
  </head>
  <body class="app" unresolved>
    <header role="banner">
      <div class="viewport">Header</div>
    </header>
    <div class="viewport">
      <div class="content-wrapper">
        <px-app-nav class="navbar" nav-items="[]" path-prefix="#" path-key="state">
        </px-app-nav>
        <main class="u-pt-- u-pr-- u-pl--" role="main">
          <section role="region"></section>
        </main>
      </div>
    </div>
    <footer class="flex flex--middle" role="contentinfo">
      <div class="viewport">Footer</div>
    </footer>
  </body>
</html>
The public/polymer-loader.html file:
<!DOCTYPE html>
<link rel="import" href="bower_components/px-theme/px-app.html">
<link rel="import" href="bower_components/px-theme/px-theme.html">
<link rel="import" href="bower_components/px-app-nav/px-app-nav.html">
Here, index.html contains the application layout, and polymer-loader.html includes import declarations for all components that are used within the application. The header and footer content should be placed inside the corresponding .viewport child elements.
The mentioned code renders the following page:
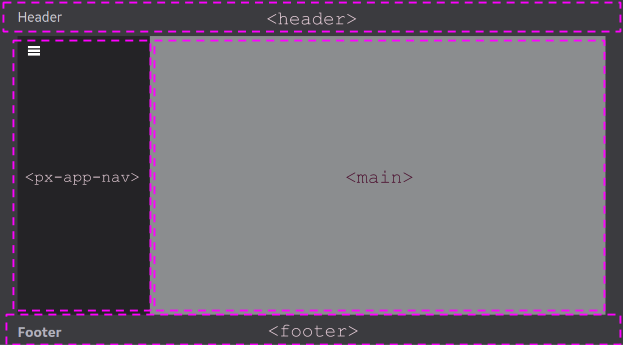
The basic page sections are highlighted and labeled in the image above.
The px-app-nav component is not supposed to have any user-provided elements except px-login. Its content is generated based on the nav-items attribute value.

Login
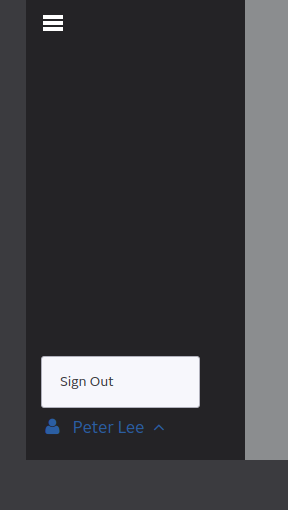
As its name implies, px-login is a Predix UI component responsible for providing a user with interactive means to log in. It is claimed to be easily integrated with UAA; however, the integration is not self-evident and requires four endpoints on your server side.
Here is how the login component looks like for guest users:

Below is the page element displayed after signing in:
The login process basically consists of the following steps:
- The user clicks the Sign In button that opens the
/loginpage served by Express.js. - Express.js receives the
/loginrequest and redirects the user to the UAA login page. - UAA authenticates the user and redirects the browser to the
/auth_callbackendpoint served by Express.js, passing the authentication code in the query parameters. - The server generates a user token based on the authentication code. The token is saved to the session storage.
- The server requests the user information from UAA. The information is saved to the session storage.
- Express redirects the browser back to the page, where the user was before the first step.
The authentication token cannot be received during step 3, because the process requires client authentication and it is not secure to expose this information to the user. Generating the authentication code involves only the client ID, which can be exposed to the user without a significant risk.
Here is how to process /login and /auth_callback requests:
app.get('/login', (req, res) => {
  // For production hardcode/check host otherwise you may risk leaking user session
  const redirectUri = req.protocol + '://' + req.get('Host') + '/auth_callback';
  res.redirect(`${UAA_SERVER_URL}/oauth/authorize?response_type=code&client_id=${CLIENT_ID}&redirect_uri=${redirectUri}&state=${req.query.state}`);
});

app.get('/auth_callback', (req, res) => {
  const redirectUri = req.protocol + '://' + req.get('Host') + '/auth_callback';
  const auth = {
    user: CLIENT_ID,
    pass: CLIENT_SECRET
  };

  request.post({
    url: `${UAA_SERVER_URL}/oauth/token`,
    auth,
    form: {
      code: req.query.code,
      grant_type: 'authorization_code',
      redirect_uri: redirectUri,
      state: req.query.state
    }
  }, (err, response, body) => {
    const authData = JSON.parse(body);
    let token;

    if (!err && !authData.error) {
      token = req.session.authToken = authData.access_token;

      request.post({
        url: `${UAA_SERVER_URL}/check_token`,
        auth,
        form: {
          redirect_uri: redirectUri,
          token
        }
      }, (err, response, body) => {
        if (!err) {
          req.session.userInfo = JSON.parse(body);
        }
        res.redirect(req.query.state);
      });

    } else {
      res.redirect('/login');
    }
  });
});
In this code:
UAA_SERVER_URLis your UAA base URL.CLIENT_IDandCLIENT_SECRETare the client ID and secret key.
The px-login component receives user data through the /userinfo endpoint that returns the data obtained in step 5 of the authentication process. (The component currently needs only user_name.)
Here is my code for handling the /userinfo request:
app.get('/userinfo', (req, res) => {
  res.send(req.session.userInfo);
});
For logging out, the session has to be reset, and the user should be redirected to UAA_SERVER_URL/logout. The code is below:
app.get('/logout', (req, res) => {
  const redirectUri = req.protocol + '://' + req.get('Host') + '/';
  req.session.destroy((err) => {
    res.redirect(`${UAA_SERVER_URL}/logout?redirect=${redirectUri}`);
  });
});
Now, you have a working Polymer SPA with authentication capabilities. After reading this post, you might also want to think about how to implement routing and add actual content to your app using Predix cards or plain components.
Further reading
- Introducing Cloud Foundry CLI Plugin for Managing Predix Analytics Catalog
- Using Predix Analytics Services from a Node.js App
- Introducing a One-Click Button for Deploying to GE Predix
- Collecting Time Series Data with Predix (a Golang API Wrapper Included)